

There’s something magical about a batch of homemade scones coming out of the oven—lightly golden on top, buttery in the middle, and just crumbly enough to melt in your mouth. Whether you pair them with morning coffee, afternoon tea, or a lazy weekend brunch, scones are the kind of treat that feels cozy and impressive all at once.
If your past attempts have turned out dense or dry, don’t worry. The secret to tender, bakery-style scones lies in a few simple techniques—and once you learn them, you’ll never settle for store-bought again.
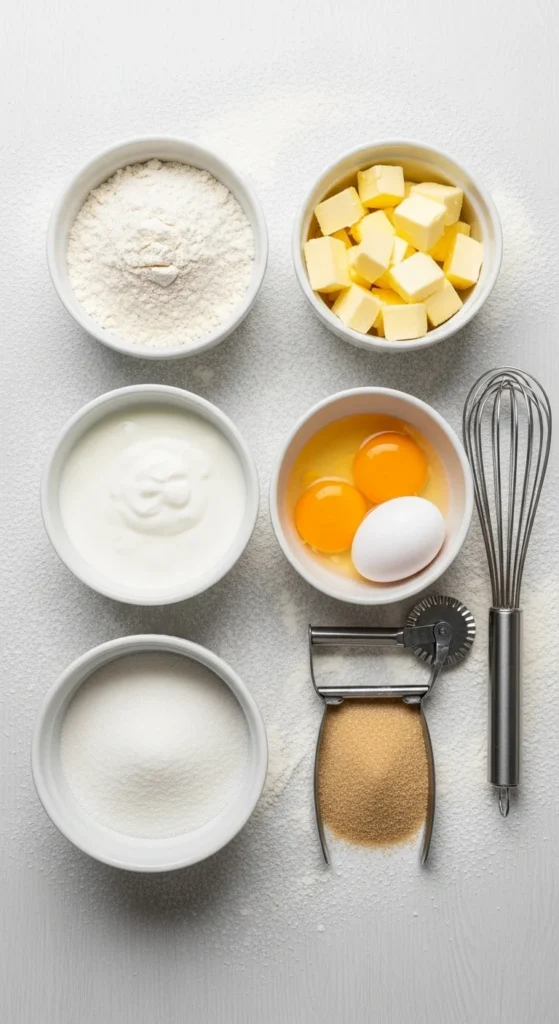
Gather the Right Ingredients
Perfect scones start with fresh, cold ingredients. Here’s your must-have list:
- 2 cups all-purpose flour
- ¼ cup granulated sugar
- 1 tbsp baking powder
- ½ tsp salt
- 6 tbsp cold unsalted butter (cut into small cubes)
- ¾ cup heavy cream (plus extra for brushing)
- 1 large egg
- 1 tsp vanilla extract
- Optional add-ins: chocolate chips, blueberries, cranberries, or orange zest
Why cold ingredients? Because cold butter is what gives scones their flaky, crumbly texture. When it melts in the oven, it creates tiny steam pockets that make each bite tender and soft.
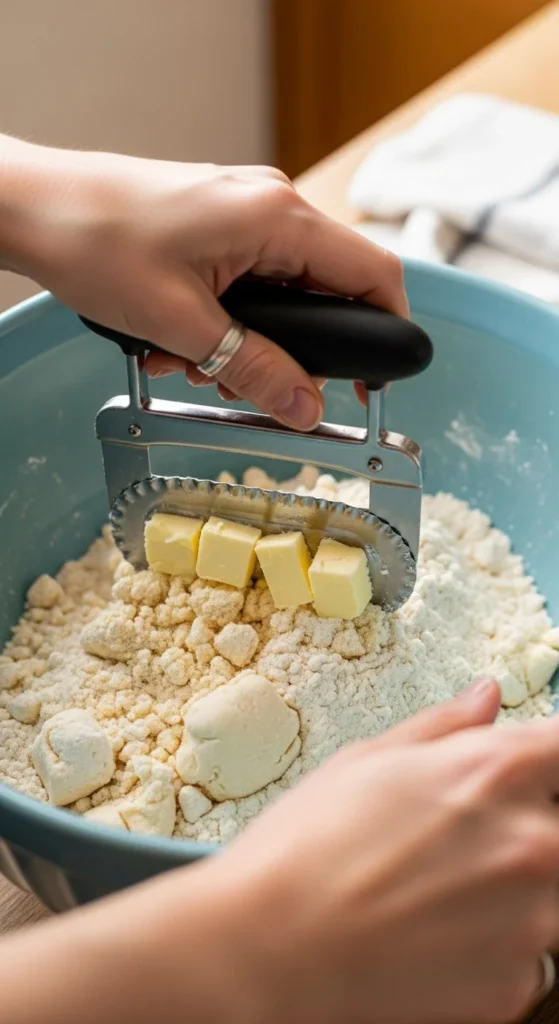
The Butter Trick That Changes Everything
The key to fluffy, crumbly scones is keeping the butter cold until the moment they hit the oven. Here’s how to do it right:
- Cut the butter into the flour mixture using a pastry cutter or fork until it looks like coarse crumbs. You should still see small butter bits—those are gold.
- Work quickly. If your kitchen is warm, pop the bowl in the fridge for 5 minutes before moving on.
- Don’t overmix! Overworked dough leads to tough scones. Stir just until the dough starts to come together.
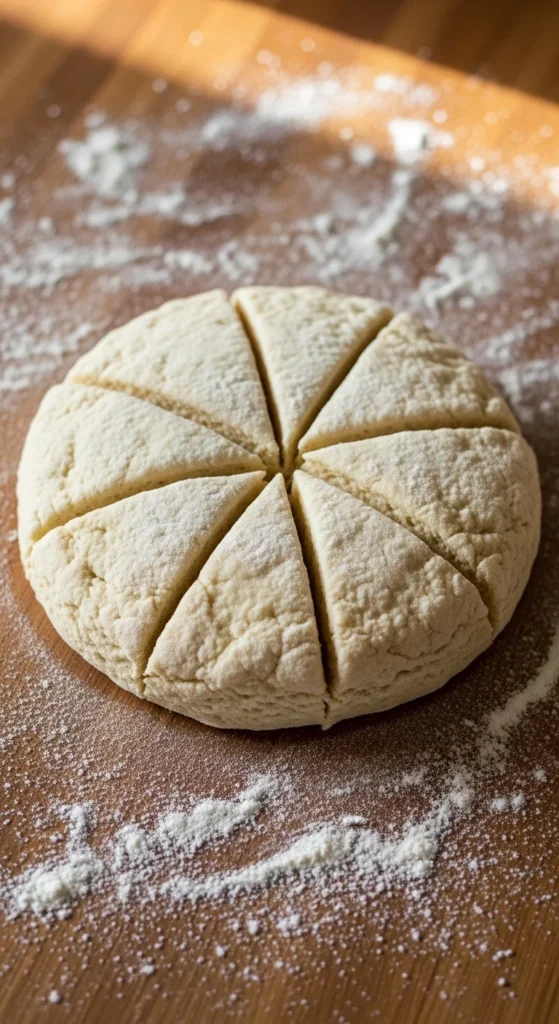
Shape, Cut, and Chill
Once your dough is just combined, it’s time to shape it.
- Lightly flour your surface and gently pat the dough into a 1-inch-thick circle.
- Use a sharp knife or biscuit cutter to cut into wedges or rounds.
- Transfer to a parchment-lined baking sheet and chill the dough for 15 minutes before baking.
Why chill? It helps the butter firm back up, giving you those beautiful flaky layers when baked.
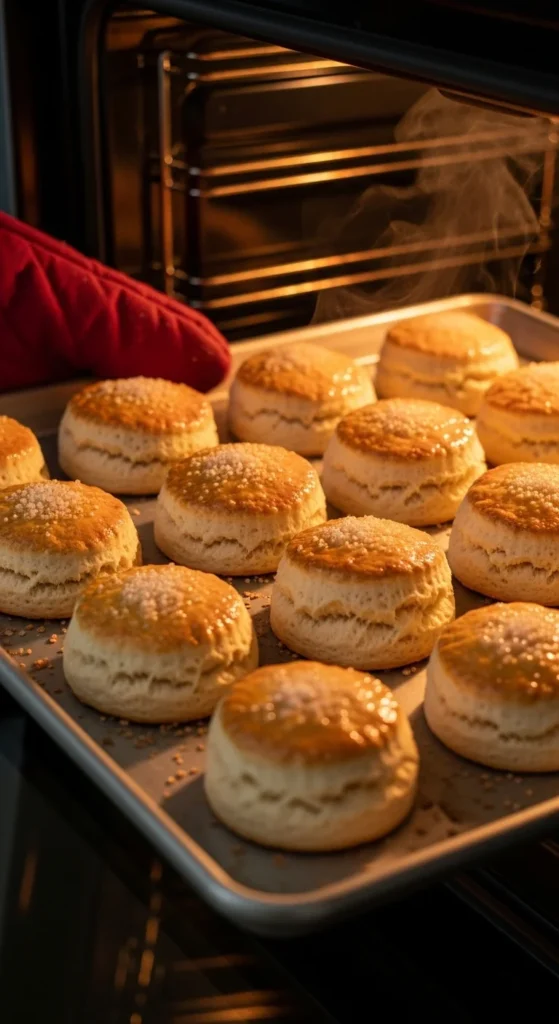
Bake to Golden Perfection
Set your oven to 400°F (200°C) and bake for 15–18 minutes, until the tops are golden and the bottoms lightly browned.
For that bakery look:
- Brush the tops with cream or milk before baking for a glossy finish.
- Sprinkle with coarse sugar for a light crunch.
Let the scones cool for 5 minutes before serving. They’ll be tender inside with that perfect crumbly edge—no dry centers here.
Make Them Your Own
Scones are endlessly customizable! Try these variations to mix things up:
- Classic English Cream Scones: Serve warm with clotted cream and strawberry jam.
- Lemon Blueberry Scones: Add fresh blueberries and lemon zest to the dough.
- Cranberry Orange Scones: Mix in dried cranberries and orange zest for a holiday twist.
- Chocolate Chip Scones: Stir in dark or milk chocolate chips for dessert-style indulgence.
You can even make savory scones by skipping the sugar and adding shredded cheese, herbs, or chopped scallions.

Tips for the Best Texture
If you want your scones to stay light, tender, and crumbly, remember these quick tips:
- Use cold butter and cream. The chill is what creates the flakiness.
- Handle gently. The less you knead, the softer your scones.
- Chill before baking. This prevents spreading and keeps the shape intact.
- Don’t skip the rest time. Even 10 minutes in the fridge helps immensely.
These simple habits separate an okay scone from a “how-did-you-make-this?” masterpiece.
The Final Touch
Serve your scones warm with butter, jam, honey, or a dollop of whipped cream. Pair them with hot tea or coffee, and you’ve got a cozy, café-style breakfast right at home.
Once you’ve mastered the base recipe, you’ll be amazed how easy it is to whip up a batch for guests—or just for yourself on a lazy Sunday morning.

Leave a Reply