

A charcuterie board isn’t just food — it’s art. From elegant holiday spreads to cozy Friday nights at home, a well-crafted board is the perfect combination of flavor, color, and texture. The best part? You don’t need to be a professional stylist to create one that looks like it belongs on Pinterest.
Whether you’re entertaining guests or treating yourself, here’s how to build a Pinterest-worthy charcuterie board that’s as beautiful as it is delicious.
Step 1: Choose the Right Board
The foundation of your masterpiece starts with the board itself. The type of board you choose sets the tone for your presentation.
Options to consider:
- Wooden boards: Classic and rustic — perfect for cozy gatherings.
- Marble or slate boards: Sleek and modern — great for elegant occasions.
- Bamboo or round trays: Ideal for small spaces or picnics.
If you don’t have a dedicated charcuterie board, don’t worry. A large cutting board or serving tray works just as well. Just make sure it’s food-safe and gives you enough space to layer all your goodies.
Step 2: Pick a Theme or Color Palette
Pinterest-worthy boards always have one thing in common — a cohesive aesthetic. Decide on a theme or mood before you start placing items.
Examples:
- Classic European: Rich cheeses, prosciutto, olives, and grapes.
- Rustic Autumn: Apples, cheddar, walnuts, and fig jam.
- Vibrant Summer: Fresh berries, soft brie, honeycomb, and herbs.
- Holiday Glam: Cranberries, rosemary sprigs, and sparkly gold accents.
By choosing a color scheme (like earthy tones, jewel hues, or monochrome neutrals), you’ll create visual harmony that photographs beautifully — and impresses your guests before they even take a bite.
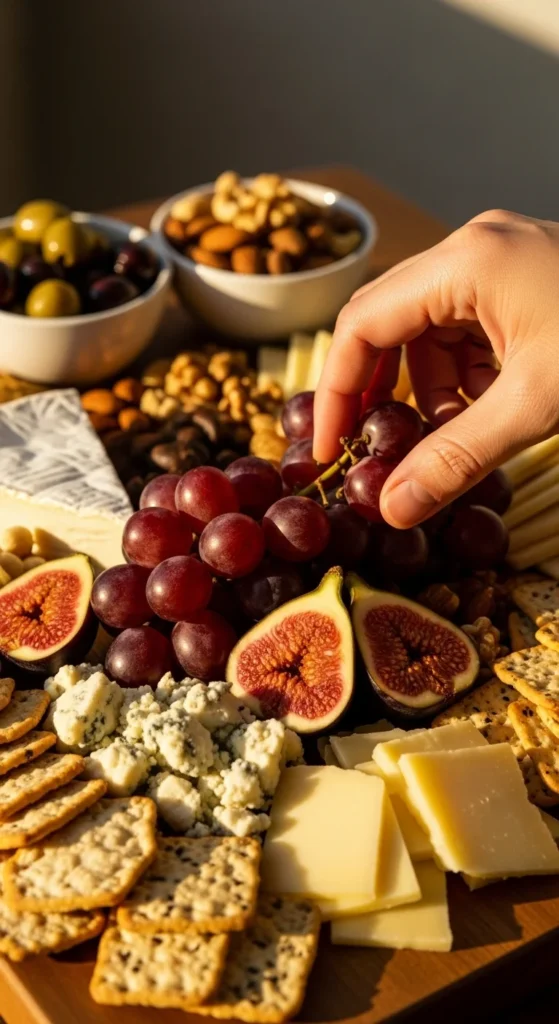
Step 3: Build Your Base — The Cheese and Meats
These are the stars of the show. Variety is key!
Cheese Tips:
Choose 3–4 cheeses with different textures and flavors:
- Soft: Brie, goat cheese, or camembert.
- Semi-soft: Havarti, gouda, or fontina.
- Hard: Aged cheddar, parmesan, or manchego.
- Bold: Blue cheese or gorgonzola for adventurous eaters.
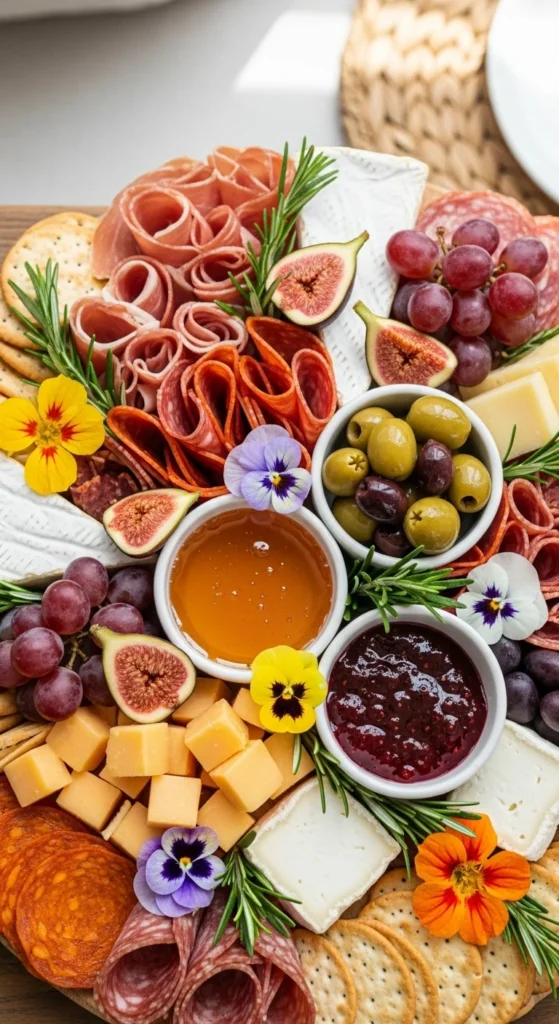
Meat Options:
Add 2–3 cured meats for contrast and texture:
- Prosciutto (delicate and salty)
- Salami (classic and flavorful)
- Soppressata or chorizo (for a spicy twist)
Arrange cheeses first (they anchor your layout), then fold or roll the meats around them for balance and movement.

Step 4: Fill in the Gaps with Crackers, Bread, and Crunch
Now that the main elements are in place, it’s time to add the supporting cast.
Crunchy Elements:
- Crackers of different shapes and sizes
- Toasted baguette slices or breadsticks
- Pretzels or crostini for extra texture
Pro Tip: Don’t line up crackers perfectly — stack and layer them in small, natural-looking piles. It makes the board look effortlessly styled and inviting.
Step 5: Add Color with Fruits and Vegetables
This is where your board comes alive. Bright pops of color draw the eye and add freshness to rich meats and cheeses.
Fresh Fruits:
- Grapes, strawberries, blackberries, figs, and apple slices
Dried Fruits:
- Apricots, cranberries, or dates for sweetness and contrast
Veggies:
- Cherry tomatoes, cucumber slices, or roasted peppers
Place colorful ingredients between neutral items like bread or cheese for balance. Think of it like painting — the boldest colors should stand out evenly across the board.
Step 6: Add the Final Touches — Dips, Nuts, and Garnishes
To make your board truly Pinterest-worthy, finish with small details that add both flavor and beauty.
Dips and Spreads:
- Honey or honeycomb
- Grainy mustard
- Jam, chutney, or fruit preserves
- Hummus or olive tapenade
Spoon them into mini bowls or ramekins and tuck them into empty spaces.
Nuts & Extras:
- Almonds, pistachios, or candied pecans for crunch
- Olives or pickles for briny contrast
Garnish:
- Fresh herbs like rosemary, thyme, or basil sprigs add instant polish.
- Edible flowers (like pansies or nasturtiums) give a pop of color and elegance.
Step 7: Arrange Like a Pro
Here’s how to make your board look naturally stunning instead of cluttered:
- Work in odd numbers: Clusters of 3 or 5 items look balanced.
- Vary heights: Stack cheese or use small bowls to create dimension.
- Let it overflow: A little abundance makes your board feel inviting.
- Mix textures: Smooth brie, crunchy nuts, juicy fruits — variety is everything.
And don’t stress perfection. A bit of asymmetry adds charm and authenticity.
The Takeaway
A Pinterest-worthy charcuterie board is all about balance, color, and creativity. Mix flavors, layer textures, and let your ingredients shine — the more variety, the better.
Once you’ve built your board, snap a photo (because yes, it’ll be gorgeous), pour yourself a glass of wine, and enjoy your creation with good company.

Leave a Reply